
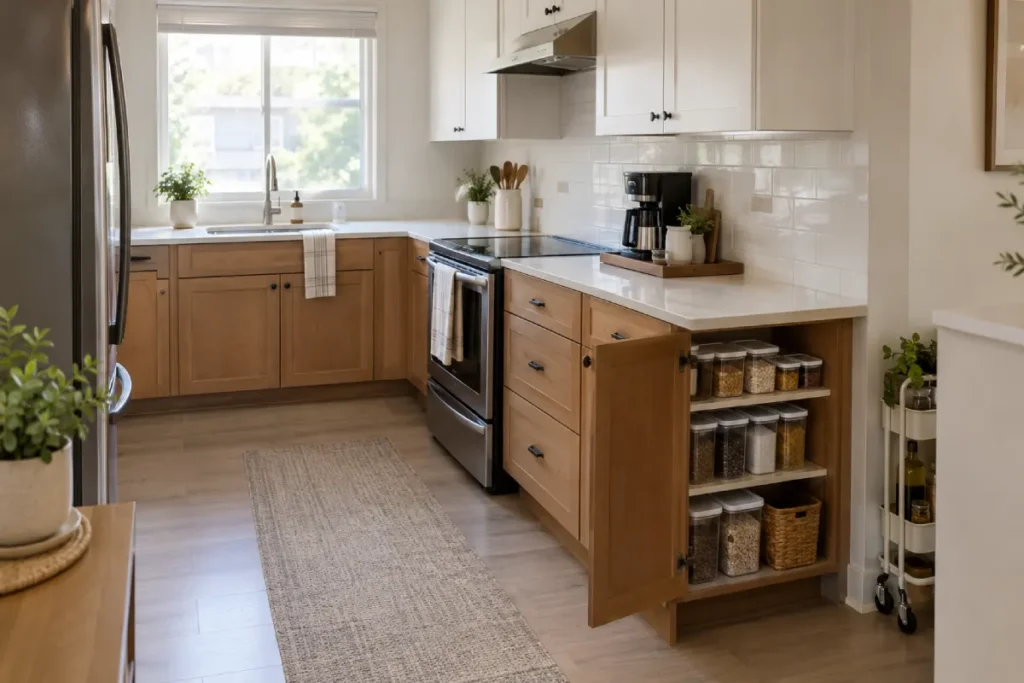
If your kitchen has no pantry, groceries go wherever there is a free surface, and the counter is usually the first one. A bag of rice ends up beside the toaster. A box of cereal joins it. A week later there is nowhere left to chop an onion.
This post contains affiliate links. If you buy through them, I may earn a commission at no extra cost to you. Images are AI-generated illustrations. Read the affiliate disclosure.
Most renters can’t add a pantry, and plenty of homeowners can’t either. A wall may be load-bearing, and a freestanding pantry cabinet takes floor space that a small kitchen doesn’t have. What these kitchens usually do have is cabinets, cabinet doors, a few awkward gaps and a strip of empty space above the cupboards. The kitchen organization ideas below are built around those spaces, so you don’t need to buy furniture or change the layout.
They are grouped into three parts: cabinets, extra space and daily habits. Each idea includes the measurements to check and the mistakes to avoid, so you can pick the ones that fit your kitchen and skip the rest.
Before You Start: Take Stock of What You Own
Most of the clutter in a kitchen without a pantry comes from having more food and gear than the storage can hold. If you buy bins before you sort, you end up with neat containers full of things you don’t need. Spend twenty minutes on a quick audit first.
Clear the busiest stretch of counter and put everything on the table. Check the dates on food while you’re at it. Crackers that have gone soft, a bag of flour bought for one recipe two years ago and three half-used bottles of the same oil can all go. Sort what’s left into four piles: food, cooking tools, appliances, and things that don’t belong in a kitchen at all, like mail and keys.
Then take a tape measure to the cabinets. Write down the width, depth and height of each shelf, plus the gap between the tops of the cabinets and the ceiling. Every one of the kitchen organization ideas in this article depends on a measurement, so keep the list on your phone while you shop. A rack that is half an inch too wide is a rack you will return.
Cabinet Kitchen Organization Ideas That Do the Work of a Pantry
Cabinets are where a pantry-less kitchen has the most room to improve, because the space already exists. It is just rarely organized around what you actually reach for. Start here, since these five changes remove the most clutter from the counter.
1. Turn One Cabinet Into a Mini Pantry
Choose one cabinet for packaged food and keep everything else out of it. Heat and moisture shorten the life of flour, pasta, crackers and cereal, so skip any cabinet beside the stove, oven or dishwasher, and the one above the fridge, which stays warm from the heat the fridge gives off. A cabinet on a wall away from appliances, at roughly waist to eye level, is the best choice.
Wipe the shelves and let them dry before you fill them. Then group items by type: pasta and grains, canned goods, snacks, baking supplies and breakfast foods. Put loose bags and small boxes in shallow bins. A bin lets you take out a whole category at once, so when you want to bake you lift out the baking bin instead of moving half a shelf to find the baking powder.
If you move flour, sugar or rice into airtight containers, write the purchase date on the lid and keep the cooking instructions if the bag had any. Heavy cans go on the lowest shelf, and the things you grab every day go at eye level.
If one cabinet isn’t enough, take the one next to it instead of scattering food across three different places. A mini pantry is the most useful of all the kitchen organization ideas for a home without a pantry, because it gives you one spot to check before you shop. That means fewer duplicate purchases and fewer bags landing on the counter.
Optional product: Stackable clear shallow bins with handles, sized to fit your shelf depth

2. Add Shelf Risers to Deep Cabinets
In a deep cabinet, whatever sits at the back is hard to see and harder to reach. Cans slide behind other cans, and a jar of tomato paste can sit there for a year. A riser is a small step-shaped shelf that lifts the back row above the front one, so both rows are visible at once. Shelf risers are the kitchen organization ideas to try first if you have deep cabinets full of cans, jars and bottles.
Measure the space between shelves before you buy. The riser plus the tallest item on it has to fit under the shelf above, with a little room left to slide things in and out. Shelf heights inside one cabinet are not always the same, so measure every shelf you plan to fit rather than assuming they match.
Risers aren’t the only option. A lazy Susan suits corner cabinets and tall bottles, because one spin brings the back to the front. A pull-out drawer or wire basket works for bags and boxes, and it lets you reach the back without crouching on the floor.
Whatever you choose, keep the front row for what you use weekly and the back row for backups. When you buy a new can, slide it behind the older one. Using the oldest food first is how you stop finding expired tins at the back.
Optional product: Expandable stepped shelf risers (metal or sturdy plastic)

3. Use the Inside of Cabinet Doors
The inside of a cabinet door usually goes unused. A slim rack that screws or sticks onto the door can hold foil, plastic wrap and measuring spoons, and a few hooks can take oven mitts or a dish towel. On the door of the cabinet where you keep pots, a lid rack is worth having, since lids are awkward to stack. On the sink cabinet, a narrow rack can hold sponges and a roll of trash bags.
Keep the load light, because heavy racks put strain on the hinges. Check the depth as well: measure the space between the closed door and the front edge of the shelf, and buy a rack thinner than that, with a little room to spare. Hold the rack against the door and close it slowly before you drill or peel off any adhesive backing.
Door racks are among the kitchen organization ideas that work in rentals, because many of them need no drilling. Adhesive racks hold less weight than screwed ones, and some leave marks when they come off, so choose removable strips rated above the weight of what you plan to hang. Keep sharp items like graters in a sleeve, since you will be reaching in without looking.
Optional product: Slim cabinet door rack with removable adhesive strips

4. Move Spices Into a Drawer or Cabinet Organizer
A dozen spice jars take up a good stretch of counter. Put them in a shallow drawer, standing upright with the name written on each lid, or use a tiered organizer inside a cabinet so the back row sits above the front one. If you choose a drawer, check that the jars are shorter than the drawer is deep, or it won’t close.
Spice storage is one of the kitchen organization ideas where location matters as much as the rack. Keep the jars away from the stove. Heat and steam make ground spices lose flavor and clump together, and light fades them as well. Put the ones you use daily, such as salt, chili powder and cumin, at the front, and the ones you only use at holidays at the back.
Ground spices lose flavor faster than whole ones, so write the purchase date on the bottom of each jar. When you next clear out the cabinet, you will know which ones to replace. If you find two jars of the same spice, use up the older one first.
Optional product: Tiered spice organizer or in-drawer spice insert

5. Give Containers and Lids One Home
Containers and lids drift apart over time. Take everything out and match each lid to a container. Throw away lids with no container, containers with no lid, and anything warped or cracked, since a warped lid won’t seal anyway. Stained containers still work, so keep those if the lid fits.
Nest the containers by size and stand the lids upright in a small bin or a cheap file holder beside them. If your cabinet has room for only one organizer, use the file holder, because a lid standing on its edge is easy to find, and the containers nest on their own.
This is one of the cheapest kitchen organization ideas here, and it usually frees up a shelf. If you rarely use more than four or five containers, donate the rest or box them up and store them in the top cabinet. Buying one matching set in a single shape, such as all square with the same lid size, makes the system easier to maintain the next time you replace something.
Optional product: Adjustable lid organizer or a simple file holder
Find Extra Space You Didn’t Know You Had
If the cabinets are full, look at the spaces around them. Most kitchens have at least one unused gap, wall strip or top shelf. The next two kitchen organization ideas show how to use them without blocking anything.
6. Use the Space Above the Cabinets
Measure the gap before you plan anything. Some kitchens have a foot of clearance up there, and others have five inches. If it’s tall enough, use it for things you reach for a few times a year, like holiday dishes, a spare platter or a rarely used serving bowl. Using the top of the cabinets is one of the few kitchen organization ideas that adds storage without taking over anything you use daily. If your cabinets run all the way to the ceiling, skip this one.
Kitchen air carries grease, and grease turns dust into a sticky film. Use boxes or baskets with lids, and write what’s inside on the front. Don’t store anything above the stove or oven, where heat and grease build up fastest. Use a step stool to reach the top, not a chair, and keep anything heavy or breakable at a lower height.
Wipe the tops of the cabinets and the containers every few months, because the film builds up slowly. A basket with handles lets you lift everything down in one trip instead of carrying plates one at a time.
7. Slide a Slim Rolling Cart Into a Gap
A gap between the end of a cabinet run and a wall can take a rolling cart as narrow as 6 inches. Measure the width including the wheels and the handle, because the frame is often wider than the shelves. A slim cart is also one of the few kitchen organization ideas you can take with you when you move.
Use it for oils, sauces, canned tomatoes and baking supplies. Put the heavy cans and bottles on the bottom shelf so the cart doesn’t tip when you pull it out. Don’t park it next to the stove or oven, since heat makes cooking oil go rancid faster. Carts with locking wheels are worth the extra cost, because a cart that rolls away while you reach for a bottle is more annoying than no cart at all.
Don’t push it up against the side of the fridge. The fridge needs airflow around the back and sides to release heat, and blocking it makes the compressor work harder. Check the fridge manual for the clearance it asks for and keep the cart outside it.
Roll the cart out when you cook and push it back when you’re done. If the floor is uneven or has a lip at the doorway, test the cart with a few full bottles on top before you trust it.
Optional product: Slim 3-tier rolling cart with locking wheels

Build Daily Habits That Keep the Counters Clear
Storage only holds up if the habits behind it do. The last three kitchen organization ideas are about where things go while you cook and when you come in the door.
8. Be Honest About Your Small Appliances
Appliances are the quickest of the kitchen organization ideas to test, because the only question is whether you used the thing this week. Look at what’s on your counter and think about when you last used each item. The coffee maker or kettle you use every morning has earned its place. The blender you use once a month hasn’t.
Anything you use less than once a week can go in a cabinet. Heavy ones, like a stand mixer or a food processor, belong in a low cabinet so you aren’t lifting them over your head. Let a toaster or kettle cool completely before you put it away, and wind the cord loosely so it doesn’t kink.
For the appliances that stay out, give them one corner and put a tray underneath. A tray under the coffee maker, holding the mugs and the sugar, turns one patch of counter into a coffee station, and the clutter stops spreading along the wall. Keep appliances away from the edge of the sink and from the stove, where water and heat can reach the cords.
9. Store Things Where You Use Them
Put each item near the place where you reach for it. Mugs go in the cabinet next to the coffee maker. Cooking utensils and oils go near the stove. Plates and cutlery go close to the dishwasher, so unloading takes a few steps instead of a walk across the kitchen. Of all the kitchen organization ideas in this list, this one saves the most steps and costs nothing.
The shelves between waist and shoulder height are the easiest to reach, so keep your daily items there. Heavy pots go lower, and things you rarely use go on the top shelf or at the back. When putting something away takes only a few seconds, it doesn’t get left on the counter.
Pay attention to where you stand while you cook. If you cross the kitchen for the olive oil every time, move it. You will probably open the wrong cabinet a few times in the first week after rearranging, but your hands learn the new layout quickly.
10. Stop the Counter From Becoming a Drop Zone
The counter collects mail, keys, receipts and shopping bags because it’s the first flat surface people reach when they walk in. Telling yourself to stop won’t change that. Giving those things another spot will.
Put a tray or a wall file near the door for mail, and a hook for keys. Keep a bag or small bin for reusable shopping bags, and sort the mail over the recycling bin so the junk never reaches the counter. If the kitchen is also the entrance to your home, a basket on the floor or a shelf by the door works as well. Empty the tray once a week, otherwise it becomes a second pile.
Wall space often holds the answer. A narrow floating shelf or a rail with hooks takes up no counter at all. The kitchen organization ideas that last are the ones that match how you move through the room, so stand at the door and notice where your hands put things down.
Optional product: Wall-mounted mail and key organizer with hooks
How to Choose Which Kitchen Organization Ideas to Try First
You don’t need to do all ten in one weekend. If you’re not sure where to begin, this order works for most kitchens.
Start with the mini pantry cabinet (idea 1), since it stops groceries from landing on the counter. Next, move the spices and sort the containers (ideas 4 and 5), because they cost little and take under an hour. Then deal with the appliances (idea 8) and the drop zone (idea 10), which clear the most visible counter space. Save the risers, door racks, rolling cart and top-of-cabinet storage until you’ve seen what is still missing.
The best kitchen organization ideas for your home are the ones that fix the clutter you see every day. If your counters hold mostly groceries, begin with the cabinets. If they hold mostly appliances and mail, begin with the habits.
Common Mistakes in a Kitchen Without a Pantry
A few errors are worth avoiding before you start.
Buying organizers before measuring. A bin or rack that doesn’t fit is wasted money. Measure every shelf, door and gap first.
Storing food near heat. The stove, oven, dishwasher and the area above the fridge all run warm. Dry food lasts longer in a cabinet away from them.
Putting heavy things up high. Heavy pots, jars and appliances belong low. The top of the cabinets is for light items only.
Decanting everything at once. Pouring every bag into matching jars looks neat, but it costs money and you lose the expiry dates. Do it only for the foods you open often.
Packing every shelf to the edge. Leave a little room so new groceries have somewhere to go. A cabinet packed to the edge sends the overflow straight back to the counter.
Even good kitchen organization ideas fail when the system is harder to follow than the mess it replaced. If you catch yourself skipping a step, simplify it.
What These Ideas Cost
Many of these kitchen organization ideas cost nothing. Sorting containers, choosing the mini pantry cabinet, moving rarely used appliances, rearranging by where you use things and setting up a drop zone with a basket or tray you already own are all free. The items that need a purchase are shelf risers, a door rack, a spice organizer, a file holder for lids and a rolling cart.
Prices differ by store and country, so compare a few options before you buy. Do the free changes first. If the counter is still crowded after a week, buy only what the remaining gaps need.
Frequently Asked Questions
How do I organize a kitchen with no pantry?
Start with the cabinet kitchen organization ideas: give dry food one cabinet away from heat, group it by type in bins, and add risers or a pull-out drawer if the cabinet is deep. Then use the cabinet doors, the gaps and the tops of the cabinets for everything else. Last, fix the habits that put things back on the counter.
What are the cheapest kitchen organization ideas for a small kitchen?
Sorting containers, picking one food cabinet, moving rarely used appliances into cabinets and setting up a drop zone with a tray you already own cost nothing. A file holder for lids is the cheapest accessory worth buying.
Is it safe to store food on top of the fridge?
It isn’t a good spot for dry food. The fridge gives off heat, which warms the space above it and shortens the life of flour, pasta, crackers and cereal. Use that space for light non-food items such as baskets or paper goods, and check your fridge manual for the clearance it needs.
How many of these kitchen organization ideas should I try at once?
Two or three is enough for the first weekend. Set up the mini pantry, move the spices and create a drop zone, then live with the result for a week before you buy anything else.
How do I keep the counter clear for good?
Give every item a home, keep one drop zone for mail and keys, and put away anything you haven’t used this week. Spend two minutes at the end of the day returning things to their places.
Final Thoughts
A kitchen without a pantry works when every item has a clear place and the places are chosen for heat, reach and measurements, not looks. Start with one cabinet for food, then handle the spices, appliances and drop zone one at a time. Even a few of these kitchen organization ideas will free up noticeable counter space.
You don’t have to follow all of these kitchen organization ideas in order. Take the ones that fit your kitchen, measure first, and adjust as you go.
This post contains affiliate links, and I may earn a small commission at no extra cost to you if you purchase through them. Images in this post are AI-generated for illustrative purposes. See our affiliate disclosure for details.
Read next: 15 smart storage products for small homes · Small apartment decorating and storage ideas

