
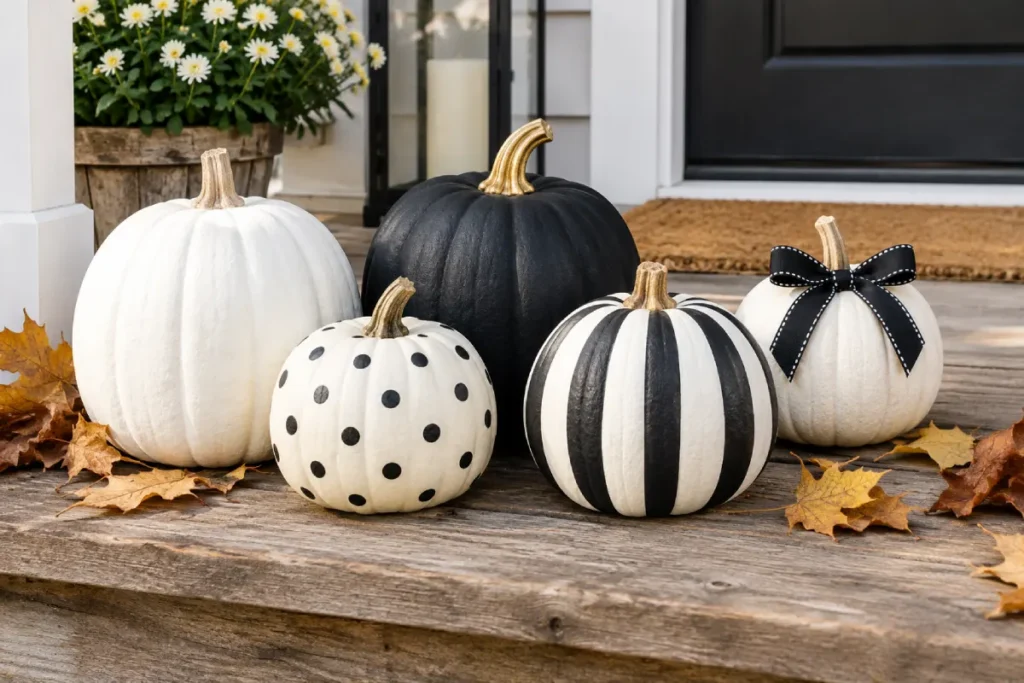
Carving a pumpkin is messy. You scoop out slimy seeds, fight with a dull knife, and then watch the pumpkin start to sag within a week. These no carve pumpkin decorating ideas skip all of that. They last longer, they are safer for kids, and you can start decorating the day you bring the pumpkin home.
You do not need special skills either. Paint, fabric, stickers, ribbon, and a few cheap craft supplies can turn a plain pumpkin into something worth putting by the front door. The no carve pumpkin decorating ideas below suit different styles, budgets, and skill levels, so you can pick what fits your home and your free time.
1. Paint Pumpkins in Classic Halloween Colors
Wash and dry the pumpkins, then paint each one a single color: black, orange, purple, or white. Acrylic craft paint works well. The first coat usually looks patchy, especially over orange skin, so plan on two coats and let the first dry for about an hour. Line up three or four pumpkins of different sizes on the porch steps. If you are looking for no carve pumpkin decorating ideas to start with, this is the easiest one.
Optional product: Apple Barrel Acrylic Craft Paint (black, orange, purple, white)
2. Create Elegant White Pumpkins
Brush on two thin coats of white acrylic paint instead of one heavy coat. A thick coat runs down the ridges and leaves streaks. Matte paint gives a soft, chalky finish. If pure white feels harsh, mix in a drop of beige or buy a cream shade. Nothing about this look says Halloween, so these pumpkins can stay on the table until Thanksgiving.
Optional product: FolkArt Home Decor Chalk paint in white
3. Decorate Pumpkins with Gold Accents
Painting a whole pumpkin gold is expensive and looks heavy. Instead, cover only the stem, or paint one thin band around the middle. A gold paint pen is easier to control than a brush if you want fine lines along the ridges. Gold shows up best on black, white, and dark green pumpkins. On orange it nearly disappears.

Optional product: Sharpie Oil-Based Paint Marker in gold
4. Make Polka Dot Pumpkins
Start with a solid base color and wait until it is completely dry. Dip the flat end of a pencil eraser into paint, dab it once on a paper plate to remove the extra, and press it straight down on the pumpkin. Work from the top toward the bottom, spacing the dots about a finger apart. Black dots on white, or white dots on black, give the sharpest contrast. Polka dots are a good first project if you are new to no carve pumpkin decorating ideas.
Optional product: Loew-Cornell foam pouncers
5. Try a Black-and-White Striped Pumpkin
Paint the pumpkin white and let it dry overnight. Run strips of painter’s tape down the pumpkin along its natural ridges and press the edges down firmly. Paint the gaps between the strips black. Remove the tape while the paint is still slightly wet, pulling it back on itself so it does not lift dried paint. Touch up any bleeding edges with a small brush.
Optional product: FrogTape Delicate Surface Painter’s Tape
6. Add Floral Designs to Pumpkins
For painted flowers, dab five petals in a circle with a round brush, then add a dot of a different color in the center. For a faster version, cut flowers from a floral paper napkin and peel away the plain white layers underneath, leaving only the thin printed layer. Glue it on with decoupage glue and brush more glue over the top. Cluster the flowers around the stem and let a few trail down one side.
Optional product: Royal & Langnickel round brush set

7. Cover Pumpkins with Stickers
Craft stores sell sticker sheets with bats, ghosts, moons, stars, and tiny pumpkins. Press them onto a clean, dry pumpkin with a smooth surface, since stickers do not hold well on bumpy skin. Light stickers show up on a black pumpkin, and black ones show up on orange. Of all the no carve pumpkin decorating ideas, stickers are the cleanest option for small children, so they suit a party table too. Peel stickers off slowly later and wipe away any residue with a damp cloth.
Optional product: Fun Express Halloween sticker sheets
8. Make a Glitter Pumpkin
Brush craft glue over one section only, such as the top, the stem, or a single wide stripe. Hold the pumpkin over a sheet of paper and sprinkle glitter over the glue. Let it sit for a few minutes, then shake off the loose glitter. A partly covered pumpkin sheds less than a fully covered one, and the contrast with the plain surface makes the sparkle stand out. A light coat of clear spray sealer helps if the pumpkin will sit outside.
Optional product: Martha Stewart Crafts glitter with Aleene’s Original Tacky Glue
9. Create a Chalkboard Pumpkin
Apply two coats of chalkboard paint and let it cure for a full day. Rub the side of a piece of chalk over the whole surface, then wipe it off with a dry cloth. This prepares the surface so later drawings erase cleanly. After that, write a welcome message, draw a spiderweb, or let children draw faces. A damp cloth wipes it clean. Keep it under a roof, because rain will wash the chalk away.
Optional product: Rust-Oleum Specialty Chalkboard Paint

10. Decorate Pumpkins with Pressed Leaves
Gather leaves that are small, flat, and dry. Fresh ones curl and turn brown within a day or two. Brush decoupage glue on the back of each leaf, press it onto the pumpkin near the stem, and overlap a few for a fuller look. Once the glue is set, brush a thin layer over the top to seal the edges. Maple and oak leaves are good choices, and cream or white pumpkins show off their color best. Because the leaves cost nothing, this is one of the cheapest no carve pumpkin decorating ideas.
Optional product: Krylon Crystal Clear Acrylic Coating spray
11. Try a Decoupage Pumpkin
Choose a patterned paper napkin or a piece of thin wrapping paper in fall colors. Tear it into pieces instead of cutting it, because torn edges blend together while cut edges leave visible lines. Brush glue onto a section of the pumpkin, lay a piece on it, and smooth it from the center outward to push out wrinkles. Overlap the pieces slightly. When everything is dry, add a final coat of glue over the whole surface.
Optional product: Mod Podge Matte Decoupage Glue
12. Make a Gingham Pumpkin
Gingham is one of the no carve pumpkin decorating ideas that looks harder than it is. Start with a white or cream pumpkin. Thin your paint with a little water so it becomes slightly see-through. Paint evenly spaced vertical stripes with a flat brush and let them dry. Then paint horizontal stripes across them. Where the stripes cross, the two layers of thin paint stack up and form darker squares, which creates the checked pattern. Rust, sage green, and navy all look good on a cream base. Test your paint on paper first, because thick paint will not show the darker squares.
Optional product: DecoArt Americana Acrylic Paint in fall shades

13. Add a Velvet Fabric Wrap
If you want something soft instead of painted, fabric is one of the best no carve pumpkin decorating ideas. Cut a square of velvet roughly twice the width of a small pumpkin. Lay it over the top, gather the extra fabric at the stem, and tie it with twine or a thin ribbon. Arrange the folds so they fall naturally. Emerald, burgundy, and navy velvet look rich against rough wood or a metal tray. Keep this one indoors, since rain and damp will stain the fabric.
Optional product: Hobby Lobby velvet fabric (one yard)
14. Create a Sweater-Wrapped Pumpkin
Cut a sleeve off an old knit sweater, long enough to cover the pumpkin with a few inches to spare. Slide the pumpkin in with the cuff at the top, then close the open end by tucking it under the pumpkin or tying it with yarn. Fold the cuff down around the stem like a collar. Chunky knits in cream, gray, or mustard look especially cozy. If the sweater has a button, sew it on as a decoration.
15. Make a Mini Pumpkin Topiary
Choose three or four small artificial pumpkins with flat tops and bottoms, in sizes that step down from large to small. Make a hole through the center of each one, then slide them onto a wooden dowel, biggest at the bottom. Set the dowel into a heavy pot filled with soil or stones so the tower does not tip over. If you skip the dowel, stack the pumpkins with hot glue and let each layer set before adding the next. Real pumpkins are too heavy and too soft for this idea.

16. Decorate Pumpkins with Ribbons
Ribbon is the quickest of the no carve pumpkin decorating ideas if you only have five minutes. Cut a piece long enough to wrap around the stem twice, with extra length for a bow. Tie it at the base of the stem, or put a dot of glue under the knot so it stays in place. Wired ribbon holds its shape better than soft satin. Plaid, velvet, and burlap all suit fall, and a black ribbon on a white pumpkin looks sharp. For outdoor pumpkins, choose a water-resistant ribbon, because plain fabric sags in the rain.
Optional product: Offray wired-edge ribbon
17. Add Faux Spiderwebs
Start with a black or white painted pumpkin, since the web shows best against a solid color. Pull a small handful of stretchy spiderweb filling from the bag and tear off a piece about the size of your palm. Stretch it thin and drape it over the stem, letting it hang down one side. Thin webbing looks far more realistic than a thick wad. Place a plastic spider in the web, and use a dot of glue to keep it from sliding. Skip this idea in windy spots, because the webbing blows away easily.
Optional product: Beistle stretchable spider web with plastic spiders
18. Make a Mummy Pumpkin
Tear a roll of gauze or old white cotton fabric into strips about an inch wide. Dab glue on the pumpkin and wrap the strips around it in different directions, overlapping some of them. Leave a gap near the middle for the face. Messy, uneven layers look more like real mummy wrappings than neat ones. Glue two large craft eyes into the gap. For an aged look, dab the strips lightly with watered-down brown paint or a damp tea bag and let them dry.
Optional product: Darice self-adhesive wiggle eyes and Dynarex gauze bandage rolls

19. Create a Monster Pumpkin
Monsters are the most playful of the no carve pumpkin decorating ideas, so let the kids help. Paint the pumpkin a bright color such as lime green, purple, or blue, and let it dry. Cut a wide mouth and sharp teeth from white felt and glue them on. Add one big craft eye, or two or three in different sizes. Small horns made from folded paper or felt cones can go on top. Hot glue holds felt better than craft glue, so use it if you have it. Mismatched features make the monster funnier, so do not worry about making both sides even.
20. Paint a Ghost Pumpkin
Use a white pumpkin, or paint an orange one white with two coats. Once dry, paint two tall black ovals for eyes and a smaller oval for the mouth. A round, open mouth looks surprised and friendly. Draw the shapes lightly in pencil first if freehand painting makes you nervous. A small black paint pen is useful for fixing mistakes. Make a group in different sizes for a ghost family.
21. Make a Candy Corn Pumpkin
Paint the pumpkin white first, then divide it into three bands with painter’s tape or a pencil line. Real candy corn has a wide yellow base, an orange middle, and a white tip, so paint yellow at the bottom, orange in the middle, and leave the top white. Let each band dry before painting the next so the colors do not blend. A tall, narrow pumpkin gives the most candy-like shape.

22. Create a Galaxy Pumpkin
Galaxy designs are no carve pumpkin decorating ideas that suit older kids and teens. Paint the whole pumpkin black or deep navy and let it dry. With a sponge or a dry brush, dab on patches of purple, blue, and a little pink, blending the edges while the paint is still damp. Keep the colors uneven, since real nebulae are never neat. Dip an old toothbrush in white paint and run your thumb across the bristles to scatter tiny stars over the pumpkin. Add a few larger stars with a paint pen. Cover your work surface first, because the star step gets messy.
23. Decorate with Faux Pearl or Gem Details
Buy flat-backed pearls or gems, which sit flush against the surface. Plan your pattern by laying the pieces on the pumpkin without glue first. A line down one ridge, a spiral from the stem, or a small ring around the stem all look good. Attach each piece with craft glue or hot glue and press it for a few seconds. Stick to one color family, such as all white pearls or all gold gems. Mixing too many types looks cluttered.
Optional product: Darice self-adhesive flat-back pearls
24. Make a Rustic Farmhouse Pumpkin
If your home already has a country look, this is one of the best no carve pumpkin decorating ideas to match it. Paint the pumpkin a muted color like cream, gray, or soft sage, using a dry brush so some of the original color shows through. Wrap twine three or four times around the stem and tie a loose knot. Tuck a sprig of dried wheat, eucalyptus, or lavender under the twine. Set the pumpkin on a wooden crate, a metal bucket, or a cutting board to match the look. Keep the paint matte, since shine does not suit this style.
25. Create a Pumpkin Centerpiece
A centerpiece pulls your favorite no carve pumpkin decorating ideas together in one display. Place a tray, a wooden board, or a table runner in the center of the table. Group three or five decorated pumpkins on it in different heights and sizes. Odd numbers look more natural than even ones. Fill the gaps with leaves, pinecones, or small battery candles. Keep the arrangement low enough that guests can see each other across the table, and stick to a limited color palette so it looks planned.
Optional product: Luminara flameless LED pillar candles

Supplies You Need for No Carve Pumpkin Decorating Ideas
Most no carve pumpkin decorating ideas need only a handful of basic supplies, and you probably have some at home already.
- Acrylic paints, brushes, and small sponges
- Ribbons, twine, and fabric scraps
- Stickers, craft eyes, and decorative gems
- Paper napkins and decoupage glue
- Craft glue, a hot glue gun, and painter’s tape
- Artificial leaves and other seasonal accessories
Tips for Making No Carve Pumpkin Decorating Ideas Last Longer
- Clean and dry the pumpkin first. Wipe off dirt with a damp cloth and let the surface dry completely. Paint and glue stick poorly to a dusty or wet pumpkin.
- Match your materials to the pumpkin. Real pumpkins take paint and glue well, but heavy decorations can make them rot faster. Some no carve pumpkin decorating ideas, such as gems and fabric wraps, suit artificial pumpkins better than real ones.
- Keep real pumpkins cool and dry. A shaded porch or a cool room is better than direct sun, which softens the skin.
- Avoid damp spots. Rain, wet grass, and puddles speed up rot. Set pumpkins on a plate, a board, or a few flat stones so they do not sit in moisture.
Final Thoughts
No carve pumpkin decorating ideas make Halloween crafting simpler. There are no pumpkin guts to clean up, no rush to finish before the pumpkin goes bad, and plenty of room to change your mind halfway through. You can paint, wrap, glue, or stick, and the result still looks good on a porch or a table.
You do not have to try all 25 no carve pumpkin decorating ideas. Choose one or two that match the colors and style of your existing fall decor, set aside an afternoon, and start decorating.
This post contains affiliate links, and I may earn a small commission at no extra cost to you if you purchase through them. Images in this post are AI-generated for illustrative purposes.See our affiliate disclosure for details.

