
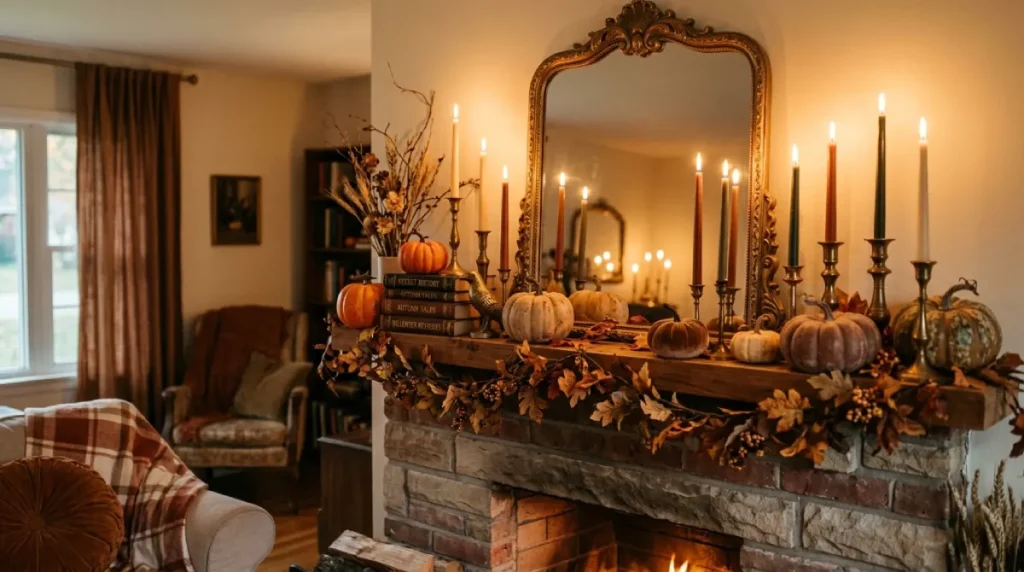
I used to think “vintage Halloween” just meant orange and black with an old picture frame thrown in. It’s more specific than that. It’s less about the colors and more about whether a piece looks like it’s earned its spot on the mantel — through age, through wear, through just existing in someone’s house for a long time before it ended up there.
That’s the whole difference between a mantel that looks styled and one that looks store-bought. Below are nine ways to build a vintage Halloween mantel that actually feels collected instead of purchased, starting with the one piece everything else hangs off of.
1. An Antique Mirror as the Centerpiece
This is the one to get right first, because everything else on the mantel is going to react to it. Gold leaf, dark wood, a frame with some honest damage on it — doesn’t matter much which, as long as it looks like it’s been hanging somewhere for thirty years.
Center it. Light a candle or two near it and you get the flicker doubled in the glass for free — one of those small effects that costs nothing but changes the whole feel of the room after dark.
The mistake people make is piling too much around it right away. A mirror that striking needs space. I’d rather see three objects near a mirror with room to breathe than ten crammed in trying to compete with it.
Skip the big box “antique-style” mirrors if you can. They’re usually too clean, too symmetrical, missing the actual wear that makes an old mirror read as old. Estate sales are slower but worth it.
Optional Product: Antique-style wall mirror (ornate gold/wood frame)

2. Vintage Halloween Prints, Loosely Grouped
Old Halloween illustrations just look different — witches with long crooked noses, cats mid-hiss, ravens, haunted houses in scratchy ink. There’s a charm to it that newer prints don’t really replicate, no matter how hard they try.
Don’t match the frames. A chipped gold one next to a plain black one next to something in worn wood. Hang them a little uneven, or lean a couple against the wall instead of hanging everything. The goal isn’t a matched set — it’s the opposite. You want it to look like these got picked up separately, at different times, maybe from different places.
Color matters more than people think here too. Sepia and faded black and cream read as old. Bright saturated color doesn’t, even if the illustration itself is genuinely vintage.
Optional Product: Vintage Halloween art prints / framed set
3. Pumpkins, But Not All the Same Kind
An entire mantel of bright orange pumpkins looks like a pumpkin patch, not a styled display. So mix in the faded stuff — dusty cream, soft brown, that sun-bleached orange color that looks like it’s survived a couple of autumns already.
Material variety helps too. Velvet next to ceramic next to something carved from actual old wood.
And don’t line them up. Group two or three loosely near a candlestick or a small stack of books instead of spacing them evenly across the mantel like a display shelf. Uneven clusters read as styled. Straight rows read as inventory.
Optional Product: Velvet or ceramic decorative pumpkins (weathered finish)

4. Old Books as Risers
Books do more work per dollar than almost anything else on this list. Cracked spines, faded gold lettering, deep burgundy or brown covers — stack two or three under a small pumpkin or a candle and you’ve instantly got height variation and that lived-in quality that’s otherwise hard to fake.
Vary your stack heights across the mantel. A tall stack on one end, a shorter one somewhere else. Same-height stacks everywhere start to look staged, which is exactly what you’re trying to avoid on a vintage Halloween mantel.
You don’t need anything rare. Thrift store hardcovers with decent spines are fine — genuinely, nobody’s going to check what’s actually printed inside.
Optional Product: Faux vintage/leather-bound decorative books
5. Candlesticks, Mismatched on Purpose
Real candlelight does something battery-powered flicker lights just can’t fake. Brass or bronze, a little tarnished ideally, tall tapers at different heights. Don’t buy these as a matched set if you can help it.
Group two or three together on one side of the mantel, then let a single tall one stand alone somewhere else. It’s a small thing, but evenly spaced candlesticks read as “just bought this,” and clustered, uneven ones read as collected over time.
Worth saying too — the actual light matters more than the candlesticks themselves. Halloween decor tips into “too spooky” pretty easily, and warm candlelight is usually what pulls it back toward cozy, even with a black cat figurine sitting right next to it.
Optional Product: Brass/bronze taper candlesticks + taper candles

6. Dried Branches, Draped Loose
Every mantel needs something that isn’t a solid object sitting still. Dried branches, a few autumn leaves, wheat stems, some darker greenery if you want it — this is what fills the gaps and keeps everything else from feeling too rigid.
Don’t lay it out straight. Let it dip low in one spot, climb up near the mirror in another, weave a stem behind a pumpkin or through a candlestick base. It should look like it grew there on its own, not like someone measured it out.
Also probably the cheapest item on this entire list. A bundle of dried stems from a craft store or your own backyard costs next to nothing.
Optional Product: Dried branches / faux wheat stems / dried floral bundle
7. A Small Cluster of Old Figurines
One lonely black cat figurine looks like it got left behind. Five or six together — a couple cats, a raven, a small lantern, some old ceramic piece with the paint chipping — starts to look like an actual collection instead of a random object.
Mix your heights. A tall raven, a low round cat, something spindly in between gives you a little skyline instead of everything sitting flat at the same level.
They don’t all need to be genuinely old, either — a couple real finds mixed with newer pieces that just look worn holds up fine. What matters more is keeping the group tight. Spread eight small pieces across the whole mantel and it just looks cluttered. Cluster them in one corner and it looks curated.
Optional Product: Vintage-style Halloween figurines (black cat, raven set)
8. One Wooden Sign, Not Three
Just one. A wooden sign with faded lettering and real wear can genuinely anchor a section of the mantel — but two or three of them together starts looking like a craft fair table instead of someone’s living room.
Keep the wording short. A single word, or a short traditional phrase, works better than something long and clever. And don’t put it front and center — tuck it slightly behind a book stack or lean it against a candlestick instead. It holds up better as a supporting piece than as the main event.
One thing worth checking: the wood tone against everything else nearby. A warm honey-brown sign next to cooler, darker pieces sticks out in a way that doesn’t feel intentional.
Optional Product: Distressed wood Halloween sign
9. Soft Textures to Finish
Everything up to this point has been hard — wood, ceramic, brass, glass. Without something soft mixed in, even a well-arranged vintage Halloween mantel starts to feel a little cold. A strip of black or deep velvet along the edge, some antique lace near the base of the mirror, maybe a fabric pumpkin with visible stitching. Small amounts. A ribbon here, a scrap of lace there.
This is usually the last thing that pushes a mantel from “decorated” to actually finished — the soft pieces are what keep all the hard materials from feeling stiff next to each other.
Optional Product: Velvet ribbon + vintage lace trim

A Few Rules That Hold It Together
If you’re not sure where to start on your vintage Halloween mantel decor: pick one big piece first — the mirror, a piece of art, something large — and build everything else around it. Go tall to short, meaning get your height established before adding smaller stuff in the gaps. Keep colors muted — rust, cream, brown, black, deep green, faded orange, nothing glossy or neon. Not everything needs to actually be old, it just needs to look like it’s been sitting there a while. And leave part of the mantel empty. That’s not unfinished — it’s usually what makes the rest of it look intentional instead of crammed.
One more thing, and it’s easy to forget: repeat your materials across the mantel. Brass showing up twice, wood showing up in three different places, velvet appearing once as ribbon and once as a pumpkin — that repetition is what ties a vintage Halloween mantel together more than any single “statement piece” ever will.
Last Thing
None of this actually requires buying much. An old mirror, some faded pumpkins, books already on your shelf, a couple candlesticks, branches from your own backyard — most people already own half of what’s needed for a vintage Halloween mantel, it’s just never been arranged with any of this in mind.
Start with one piece. See how it looks for a day or two before adding the next thing. The gaps you leave empty are usually doing more work than whatever you’d put there instead.
This post contains affiliate links, and I may earn a small commission at no extra cost to you if you purchase through them. Images in this post are AI-generated for illustrative purposes. See our [affliate disclosure] for details.

